Sunday, 16 August 2009

Finally friday challenge and the Weekly Challenge at Two Peas in a Bucket

Do you ever feel Fridays (and Saturdays and Sundays) go by in Mickey Mouse speeeed? I certainly do... Weekdays seem to be long and I am lucky if I can squeeze any scrapbooking or crafting time into my week days. Most of my time is spent on things that I certainly would not have dreamt of doing when I was a little girl... When your friends in childhood said they wanted to be firemen or princesses when they grew up, I bet you never ever answered that the purpose of your life would be to write a looong sequence of electronic mails and documents and reports and trainings followed by (on good days) some well designed electronic files (=ppt) !

My REAL life starts on Fridays at 19.00 when the last email has been appropriately answered and MS outlook is closed. I rush to deal with food and get my craft stash out. My DH wonders where all that energy suddenly comes from ... :- )

Hope you can relate! How is your usual day like? I'm a curious busybody ! Anyways... Enough about my life as craft-a-holic.

Just made this card for the Finally Friday challenge. Used Cosmo Cricket's Snorkel and Lil'Man pps. Sooo love them! Hand drawn cloud, handmade fish hook (from craft wire) and chipboard heart complete the card. I also used the Sakura Glaze pen for the stitches. Love the faux embossed look (and feel) it gives!


This card is completely handmade apart from the pp! Hand-drawn cat, cut, outlined in black and coloured with IKanDee Pearlescent chalking set...Luuurv this set. And I like the way this kitty turned out. I felt it needed a something festive so I made a bunting from various ribbon scraps and attached across the top left and stamped the sentiment inside the card. Oh and I also covered the pink bazzill with lots of shimmer chalk (to jazz it up a bit)... just doesn't well in the photos, sorry!

Thanks for looking!
Cheers,
Avantica

Saturday, 15 August 2009

Quick and Easy Cards


Wow...It's been gorgeous weather today...Not too hot...just cool and pleasant! Perfect! We desperately needed this coz the last couple of weeks it's been unbearably hot and dry! Uhhh!!!

This amazingly cool weather...i just couldn't resist... So ofcourse, I sat out on our balcony sipping some cool lemonade and got my creative juices flowing! Here are a few Quick and Easy cards I did this afternoon. Hope you like them! Don't forget to scroll down for the TIP FOR TODAY!


Annoying I couldn't capture the awesome green colour of the bg! It's such a luscious green too!

Materials Used:

  • Bazzill cardstock ( blue, orange and white)

  • Art Nation Patterned papers, We are story tellers

  • Green spotted ribbon, Maya road

  • Blue polks dot ribbon, DancingDoodlesDesign

  • Gold thin cord ribbon, DancingDoodlesDesign

  • Bookplate/ frame, Heidi Grace Mignight Kisses Punchboard Add-ons

  • Smile Stamp set, Panduro

  • Manhattan Colour Rub ons, Autumn Leaves

  • Orange gems/blingstones, DancingDoodlesDesign

  • Perfect Pearls, Ranger Inc

  • Stickles glitter glue
Leave me a comment so I can visit your blog too!

TIP FOR TODAY:

  • If you are planning on using Bazzill Bling cardstock to print your greeting or message on, always try it on a scrap piece of bling cardstock. From my experience, bling does not take well to small fonts, curly fonts, distressed fonts etc. The simple sans serif type with larger font sizes work better.
Hope this helps and have a Great week,

Cheers,
Avantica

Tuesday, 11 August 2009

Christmas in August...Allerede Jul det er Kool...!

Waaayyyy in advance: A very cool Yule to all !


I started my Christmas preparations early this year...waaaayyyy early! Last year's Christmas was a bit stressed as I had lots of charity projects, travel planning and christmas cards to make. This year I have decided that I want to be completely done with all my Christmas tasks by November!! This will be the most relaxing Christmas I have had for years (fingers crossed!). In the process I will give you tips on how to succeed in this endeavour and occasionally how NOT to succeed :-)


Today, I started with some traditional christmas colours and themes. Anyhow, here are the cards I made.


Well, firstly I'm making some christmas cards for family and friends. I thought I would try a few different styles so I have appropriate ones for differents personality types e.g.., some who dig girly stuff, some who like it plain, some who like the vintage style and so on. Usually I just make 1 or 2 styles and mass produce them for all family and friends. But this year since I'm starting early I thought it would be nice to have many different cards. And if I do run out of time, I could always just reproduce the quick and easy ones!

I gold embossed the button in the upper right hand corner here. I think it was 2 layers of embossing.
The snowman here is gorgeous! It's a happy, sparkly gold ...a shame I couldn't photograph it well !


Materials:
  • Bazzill cardstock, green
  • Bazzill cardstock, Red
  • Gold shiny metallic cardstock
  • Red stars, Classic collection (by Karen-Marie)
  • Classic Merry Christmas, Classic collection (by Karen-Marie)
  • Red dots and Stripes, Classic collection (by Karen-Marie)
  • Small red and green dots, Classic collection (by Karen-Marie)
  • Gold embossing powder
  • Clear embossing pen (Tsukineko)
  • Clear embossing stamp pad (Tsukineko)
  • Stamps, Sparkle clear Holiday messages (Hero Arts)
  • Snowman stamp set (local 1 pound shop!)
  • Miscellaneous buttons and ribbons (lss)

TIP OF THE WEEK :
  • Make a list of all family members and friends in an excel sheet. Include birthdates, addresses and email ids. This way you have all the info you need to make the cards for that month or for christmas all in one place.
  • Every month just check whom you have to make cards for and mail them off well in time. In the very least, you can always email them your congratulations! Easy!

Cheers,

Avantica

Saturday, 8 August 2009

Bone appetit 2- The Return of the Retriever


There were too many photos to upload last time. So here are the rest of the photos of the mini album.


Page 1:

Details: Hand drawn 'bone' alphas on chipboard, outlined and glittered and attached with some pop dots. Hand drawn Muffins, painted and glittered and I also added glittery swirls across the bottom right. Hand made white blossom, embossed the viens etc and layered it with more flowers and Maya road ribbon.

Page 2:


Details: Hand made bone from some fancy pipe cleaners I had lying on my table! Tied it together with a bow and voila! Glittered some hand made blossoms and used some puffy gel stickers to finish off the page.


Page 3:


Details: Inked and glittered flowers (Prima) and Gel sticker instead of a brad and a hand drawn doggie bone {water paints and then glittered (Stickles)}. Stamped and embossed doggie paws and glittered, hand drawn swirls


Page 4:
Hand drawn and coloured Kong toys, some prima flowers and puffy gel stickers.

Page 5:

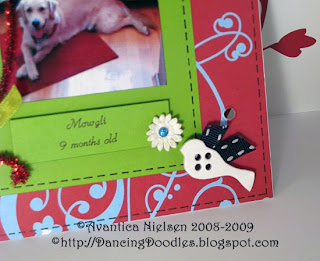
Details: I outlined and glittered the little Birdie (Maya Road), drew some glittery swirls on a Prima flower, added ribbon leaves and drew glittered swirls in upper right corner.


Thanks for looking!
Cheers,
Avantica

Sunday, 2 August 2009

Bone Appetit !

My little (well... not-so-little) furbaby just celebrated her first year this week! I cant believe my little baby is already a year old!! How time flies! I remember clearly, the day we got her home, her first explorations around our home, her first apprehensive walk, the first time she smiled, the first time she sat on a command...oh well...the list goes on! We all had a wonderful day and I made this album about my darling Mowgli.

I set myself a challenge with 3 conditions.

It had to be crafty.

It had to be about Mowgli.

It would naturally have to be cute :)

No seriously...the 3 rules were

1. I had to make it in A DAY (which is basically 4-6 hours that I have left after work, errands etc.) This was really hard as I usually tend to take a week or more!

2. Use whatever is on the table within reach. The only thing I could use which was away from my table was the printer. No internet either! I usually like to use many different techniques/ tools on a single layout so this too was hard but, I improvised with many hand drawn embellies, doodling, some pipe cleaners and creative layering. I even made the mini album from scratch...chipboard covers and all!

3. Use up my old stash. Yaaa...ay !
For the layout, I scraplifted some kind soul whom I would like to credit but honestly can't remember! If you are reading this, kindly let me know so I can credit you and thanks for the inspiration! I had seen this layout a few months ago and had just remembered it as appropriate for a pet album.
Page 6:
Details:
Page 7:

Page 8:


Details:

Page 9:
Details
Cheers,
Avantica

Sunday, 26 July 2009

Birthday card for a man

Hi all,

When I made the card for Inge last week, I also made a manly version for one of those ' Oh gosh, I need an appropriate card asap'! moments. No matter how many I make and have in my stash, I always seem not to have the right card for the right person or occasion! Is it hard for you too to find the right cards when you need them or is it just me?!!


I used the same layout for this card too. I inked the bg in two-three different shades of blue inks and then embossed french script in gold on the bg. I also stamped an image (Hero Arts) using different inks and layered the whole thing together with some pop dots. Instead of a bow, I went for a knot as I feel this is more manly. I didn't stamp a greeting on the card as this leaves it quite versatile and it can be used on various occasions.

Well, that's all for now and thanks for peeking!

Cheers,
Avantica

Thursday, 23 July 2009

Happy Birthday Inge

I hope you have a very special day! I know it must be good because Knud invited you out to an exotic destination....... ta daaa...... Germany?!! ;-)

I am sure you will paint the town red and have lots of fun... you sure have a fun personality ...And by the way, remember to bring back some good cakes for the rest of the family as you two have the world two best noses for cakes! ;-)

For all my crafty friends, that's the card I made for Inge.

I stamped and embossed the swirls (Fancy Pants stamps) on the bg paper(santuary by mambi), I also stamped the central image(Hero Arts stamps) with different inks, Layered it all together, popped it up with pop dots and finished it off with a huge, soft bow (lss)!


I didn't want to add too many 3 dimensional objects as it had to be posted across Europe. Thankfully, Inge recieved it in time and in one-piece! I hope you like it!

Cheers, Avantica